Showing posts with label D/2. Show all posts

07 February 2018

Power of D2 Biological Solution

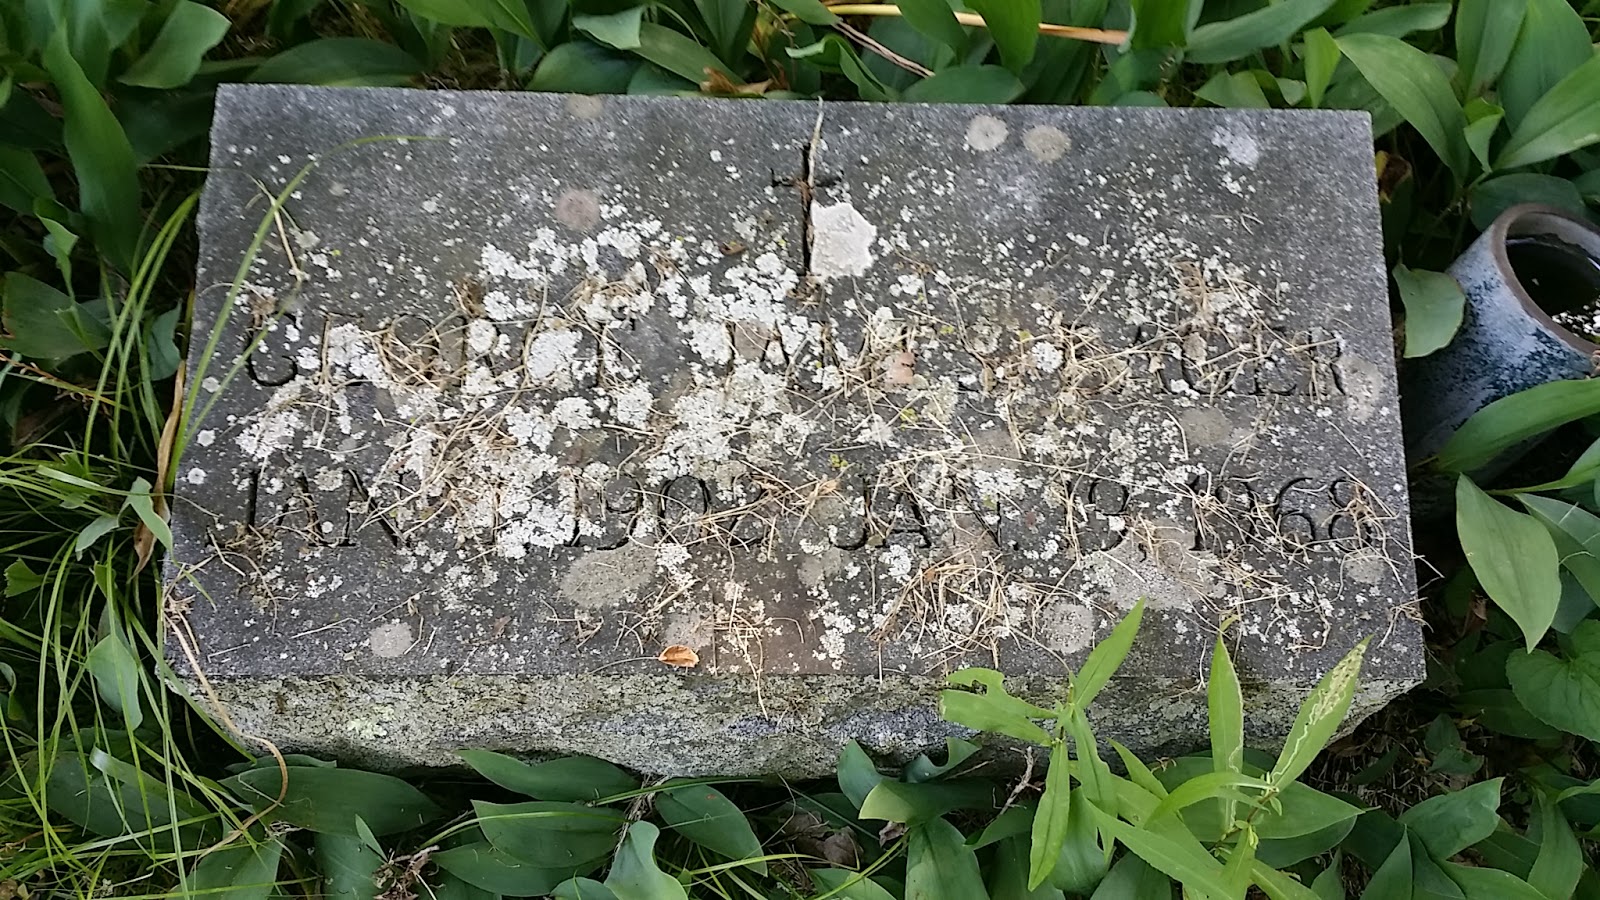
I must have touted the power of D2 Biological Solution a hundred times. But pictures say more words than I can. Below are a series of photos taken at the Nassau-Schodack Cemetery from early Summer through early Fall, last year.

The small granite gravestone is that of one of my great-granduncles, George James Eger. George was a younger brother of one of my great-grandmothers, Catherine Eger Gannon. Notice the name spelling. That is a story for another time. But quickly, George's wife thought the name was "too" ethnic and thus the name was changed.

Water, D2, & a Soft Bristle Brush

D2 is the go-to solution for removing biological growth such as moss, lichens, mold, and mildew. It will not harm the stone as other household cleaning chemicals will. The photos below show what happens over time.

June 2017, before cleaning

June 2017, immediately after cleaning

August 2017, beginning to brighten

October 2017, four to five months later


23 January 2018

Cleaning &/or Restoring Gravestones

So... you want to clean gravestones and or rehab them. My question to you is... are you crazy? OK, just kidding, it is very rewarding, but do you know what is involved, what to do, what not to do, and more importantly do you know or realize your limitations? These are questions that need to be asked in order to accomplish your task safely for both yourself and for the gravestone. It seems easy, just grab some water, yes; some brushes, perhaps if you have the correct brush; household cleaners, and get to work; no, no, no! Did I already say no?


For starters, the go-to chemical for cleaning gravestones is D2 Biological Solution. It is sold locally in the Albany area; in either one gallon or five gallon containers. It is expensive but it is the only approved chemical for cleaning biological growth off gravestones. Biological growth is moss, mold, or various lichens. Biological growth is not dirt. Dirt may or may not be removed with the use of D2. For actually cleaning a gravestone Orvus soap has been used by other conservators. I have no experience with using Orvus on gravestones. So I cannot speak on cleaning techniques with Orvus.


Before I decide to clean a gravestone the first thing that I do is look the stone over and ask myself the following questions. Does the stone really need to be cleaned? I do not simply clean every gravestone that is discolored. Only ones that are illegible and those that require repair are what I clean with D2. Is the gravestone damaged? If it is broken, can I easily handle it? During the inspection ask yourself this question, will I damage the stone more than it already is if I attempt a cleaning? If the answer is yes, leave it alone. Do not mess with it. Leave it to the pros. Most important, if I start working on this stone will it fall and possibly on me? If the stone is large always position your body away or on the side of the stone so that if it does fall it will not land on you.


Regarding damaged gravestones, the photo below shows what is known as delamination. Delamination occurs when weathering opens and a weak spot forms where the the outer layer of the stone begins to separate and flake off in layers. Do not attempt a repair on this unless you are a professional.

Photo courtesy gravestonematters.org.uk

Cleaning with Clorax is a huge no no. Clorax will damage the stone because it is a caustic chemical. Salts within the Clorax will soak into the porous stone, especially marble, and begin to eat away at the stone. This reaction will cause damage known as sugaring. Below is an example of sugaring.

Photo courtesy Internet search

Moss, lichens, and other plant growth that enter small cracks in the stone will also eventually cause more damage with the roots digging further into stone which will allow for water to enter the opening and begin a freeze thaw process that can break the stone at the crack.

Photo courtesy chicora.org

When repairing a broken stone; in the below picture, the stone is a tablet grave marker from a local cemetery. Notice the incorrect side bracing and what do you think the end result was.


The cleaning process that I use follows as such.
  • the stone is first checked for stability and damage (we do not want to incur further damage to the stone)
  • if the stone has heavy lichen growth, I begin by gently scraping the growth off with a soft scraper or popsicle stick (we want the stick to wear down and not the stone)
  • next the stone is gently scrubbed with water and a soft nylon bristle brush to further remove biological growth
  • the stone is then rinsed with clean water from a pump garden sprayer
  • D2, poured into a spray bottle is then sprayed on all faces of the stone and allowed to remain on the stone for 15 minutes
  • after 15 minutes, with fresh water the stone is again scrubbed with the soft nylon bristle brush
  • more D2 may need to be applied and scrubbed in
  • the stone is given a final rinse with the pump sprayer
  • the stone will definitely be cleaner, but within 3 months time the stone should be noticeably brighter. One thing to remember is that all gravestones are not created equal. Some clean up better than others. Sad but true.
Restoration of gravestones involves various aspects of repair. It depends on how the stone is damaged and what needs to be done for restoration.

Gravestones, especially marble stones can be found in cemeteries in three different manners. First, many of tablet style gravestones are larger than you think. The photo below shows Mary Cline's gravestone. Her stone is almost five  feet long with the majority of the stone buried in the ground for stability. Her stone was excavated, straightened, and back filled with compacted stone dust. Over the period of years her stone began to lean due to gravity and conditions of the soil.


Next to Mary's stone is her husband, Russell. His marble stone is attached to a marble base via pins and mortar. The photo below shows another plot that was in need of attention. The pins and pin holes are clearly visible in the photo.


All three stones in need of restoration
Notice the securing pin & pin holes

Iron pins held the marker to the base and mortar was applied under the stone and around the joint where the stone meets the base. Over time the mortar fails and seems to vanish.

The iron pins are removed because they tend to rust and oxidize which causes the pin to expand and this can cause the stone to break. Have you ever notices rust like discoloring and upward cracks on the stone just above the base. That is from oxidation. The iron pins are replaced with stainless rod that is cut to length and secured with a special type of lime mortar called Lithomex. The Lithomex is placed under the stone and also pointed around the joint where the stone meets the base to seal the joint.

Notice the Lithomex seal around the base of the stone

Lithomex is porous and allows the stone to "breathe." Never repair gravestones with Portland cement. Repairs with Portland cemetery can further damage the stone because Portland is much harder and stronger than marble and lime gravestones which will cause the gravestone to break and not the Portland. When a stone is repaired with lime based Lithomex the repair will break if needed and not the stone itself.

The third way that marble stones are found in cemeteries is in the mortise and tenon or tab and socket method. This is where either a small "tab" in the center of the stone fits into a slot in the center of the base or the whole tablet fits into a large slot in the base. Below is a photo of a base where the tablet fits into the slot.


This large stone below did not have a base. For some reason the base was gone and only way to keep the stone upright was to fabricate a new base. Making a new base is relatively easy. Cement, 2 x 6s, screws, and insulating foam is all that I use. The foam is cut to custom width and depth according to the size of the stone. When the base is cured the foam is removed and you have a slot where the stone can be inserted. The slot is slightly larger than the stone and is partially filled with the lime based mortar. After the stone is inserted the joint is sealed with additional Lithomex.

Fabricated new base

Putting broken gravestones back together can be a process, especially if much of the stone is missing. The epoxy that I use is Akemi Akepox 2030. It is a two part epoxy that is very strong. Not much is needed to make repairs. Just dab along the break line, secure with clamps, and then infill with Lithomex to fill and hide the crack.

Original condition
Gravesite of my great great grandfather's sister

Initial cleaning and epoxying

Broken stone attached to base

More expoxying and clamping

Before final crack infilling

Finally, gravestones are heavy. Some are light enough that they can be picked up and set in place by hand and some cannot. Therefore mechanical means are necessary to safely lift a stone in place. Below is an example of a stone that was too heavy to lift; so the tripod, hoist, and soft nylon straps were brought in to safely make needed.


As a final note, when attempting this work, be safe, do the right thing, have fun, and enjoy!

For further information on cleaning or restoring gravestones, please see:

Online Sources
Association for Gravestone Studies
Cemetery Conservators for United Standards
Chicora.org
Iscga.org

Print Sources
Strangstad, Lynette. A Graveyard Preservation Primer. New York: Altamira Press, 2013
Jones, Melanie S. Aspects of Stone Weathering, Decay and Conservation. London: Imperial College Press, 1997

14 December 2017

Tombstone Tuesday Post on Thursday

This article was meant to post on Tuesday but I was caught up in other activities. Last week before Winter actually set in I took a ride to the cemetery of the Lisha Kill Reformed Church in Colonie. I was looking for a distant cousin's gravestone to snap a photo of it. This cemetery is tiny and of course I will have to go back in the Spring to locate it because I could not find it.

However, the cemetery is very old with many older style grave markers, many of them are extremely difficult to read. As I was passing through I noticed the heavy moss growth that was growing on a particular stone. I stopped and used my finger to gently scrape the moss off. I stopped what I was doing to snap a photo of the offending moss and then proceeded to remove the rest of the moss and then take another photo. All for a future blog post. This one.

This was done because I read in various posts on other sites how some people think that a gravestone should not be cleaned ever and if you do clean a stone you are removing history and patina from the stone. Well I never heard of a gravestone having a patina such as perhaps a copper weather vane for example.

Over the years gravestones accumulate dirt, moss, lichens, and the effects of acid rain. I clean gravestones however I do not simply clean them just to clean them. My cleaning process is done so that further repairs can be made to a stone. For example if you were going to re-silicon the tile around your bathtub you would make sure that everything was clean because if you did not your work would quickly fail because your silicon would not "stick." Same with a gravestone. The stone and its base must be clean before any kind of lime based mortar can be used to seal the bottom of the stone to the base and to secure it and to keep water from migrating under the stone. I will also clean a stone if the inscription is completely unreadable. My processes for cleaning gravestones are all approved by various restoration associations, foremost being the Association for Gravestone Studies.

Back to the moss. The photos will show the moss growing inside the fizzer cracks that have appeared on the sides of the stone. Believe it or not the moss growth growing inside of the cracks and do damage to the stone just like water entering the stone and then freezing and further separating and damaging the stone.


Since it took me about 5 seconds to scrape the moss off and nothing further done to the stone. The moss will be back again next year as if I never did anything. The approved chemical for cleaning gravestones is D2 Biological Solution. D2 sprayed on the remnants of the moss and left on the stone for 10 to 15 minutes and then gently scrubbed clean with a soft bristle brush and clean water would kill all of the biological growth on the stone including moss and all lichens.


But then what remains is the fizzer cracks. They should be infilled with a lime based mortar of the appropriate color to keep anything else from entering the cracks especially water.


22 June 2015

Tombstone Cleaning Follow-Up

Earlier this morning, I went to Albany Rural Cemetery to place a flag on the grave of a man, George H. Swartwout, who married into my family. Recently I discovered that he was also a veteran of the Civil War. But unfortunately he died very shortly after he was mustered out of service.

George H. Swartwout


While at his plot I noticed a stone that I used to demonstrate how to clean a tombstone with D2 biological solution. The 10 minute video can be found on YouTube by clicking on this link. In September 2014 a blog post was created on this process. However today I was very surprised. I have known for a long time that all tombstones are not created equal. Some stones cleanup better than others. But this stone really whitened and brightened over the fall through the early summer.  The photos below will speak for themselves.


The above photo was taken before cleaning with D2.


The above photo was taken about one month after cleaning with D2.


The above photo was taken this morning; 8 months after cleaning.

28 September 2014

Gravestone Cleaning Video


Earlier this afternoon, my wife and I were at Albany Rural Cemetery and we created a short video on how to clean a gravestone. We went to a relative's lot and chose a stone within it and I began to clean the stone and also described why and how to clean it while Michele filmed the demo. The video will be at the end of this blog entry.

I must mention that I am not a professional gravestone conservator; simply a genealogist and descendant from my ancestors who is caring for his ancestors and relatives gravesites as best as he can. I have cleaned numerous gravestones of my relatives and have uprighted and leveled half-dozen others.

I admit that some stones have cleaned up better than others. But whether one gravestone comes out better than the next; they all are in much better condition that before I started.

A picture of the gravestone pre-cleaning is below.

A picture of the gravestone post-cleaning is below.


In two weeks, I will come back to this plot to check whether the gravestone has brightened. The lichens that were growing on the stone were removed and the stone is obviously cleaner than before. Time will tell how it comes out.

Below are two photos where the outcome was great with only one cleaning application.


The original video was shot in HD and was crystal clear but unfortunately the video had to be compressed in order to be uploaded on this blog.  Video quality and clarity were lost.


01 September 2014

Gibbonsville Burying Grounds

The Gibbonsville or Arsenal Burying Grounds were originally located on property now owned by the Watervliet Arsenal.  From viewing old maps of West Troy, I believe that this cemetery was located just north of the present day Valente's Restaurant which is just south of the Arsenal, today.

An early settler of that area, James Gibbons, sold a parcel of land to the United States government for the creation of the Arsenal in 1813; to support the fight against the British during the War of 1812. As time passed the Arsenal grew in size and as they needed more land the Arsenal acquired the land on which the "old burying grounds" were located.

The grave stones and bodies were removed and re-buried in section 100 of the Albany Rural Cemetery. Approximately 300 bodies were re-interned around 1918.  The majority of the stones were laid flat on the ground with only a handful being re-installed upright.  Over the years the ground has reclaimed just about all of the stones that were laid flat.  They have sunk into the ground and have been covered with dirt, grass, and leaves over the years.

About twenty years ago my wife and I took it upon ourselves to locate the grave site of one of my ancestors, Samuel Hitchcock, who was originally buried in the Arsenal Burying Grounds.  All of the stones were buried over with grass but with using a plot map from the cemetery we were able to pull the sod up and locate the grave stones.
Site of Samuel & Mary Hitchcock's gravestones

I recently went back to Albany Rural Cemetery with a plan to reclaim my ancestor's grave stone.  After twenty years, the ground again had covered the grave stones.  Twenty years ago is quite a while and my memory did not let me recall how deep the grave stones had actually sunk into the earth.  The lower part of them were at least six to seven inches deep.
Initial excavation of grave stones

It would be unsafe for the stones and for anyone walking over them in the condition that were.  Unlevel and with a huge divot missing from the ground.  Therefore I decided to completely remove the stones and place the earth which was on top of them underneath them.  I also brought out some leveling sand to make sure that the were level. The stones were placed back into the ground so that they were about 3/4" of an inch below the grade level.
Cleaned, raised, and leveled grave stones

As time passes, they will again be covered over with dirt but not to the extent that they were previously. The stones were cleaned with D/2 cleaning solution and rinsed with water.  The stones look almost brand new considering they are from the late 1820s & early 1830s.
Samuel & Mary Hitchcock
On an ending note, in between the time that I did the initial excavation of the stones and re-laid them, which was 3 days.  Someone came with the same intentions that I had regarding uncovering a stone.  The only difference was they left clumps of sod all over the place.  It looked terrible and I am sure that the cemetery would not be appreciative of their efforts.  I removed and disposed the sod that was left.  Anyone who attempts a project such as this, please make sure that the grounds are in the same condition as before you started.

29 September 2013

Follow up to Restoring a Cemetery

Summer's over and the kids are back at school.  I am finally posting after a short break.  The beautiful weather this weekend brought me out to check up on my Spring cemetery restoration project.  Today I took a ride to Our Lady Help of Christian's cemetery in Glenmont where I restored the grave site of my great-great-great grandparents.

I cleaned the stones with D/2 Biological Solution, which is a monument cleaner.  The stones were clearly much cleaner immediately after the initial cleaning.  However, after almost three months since I restored the site, the stones are noticeably brighter and cleaner.  I am extremely satisfied with the results of this product.  A link to D/2 is http://www.gravestonecleaner.com/welcome-to-cemetery-preservation-supply-llc/

Anyone wanting to clean gravestones should check out this product.  It costs $40 per gallon plus shipping but in my opinion it is worth every penny.  Below are final pictures of what this product can do.


Above: This photo was taken today, 29 September 2013


Above: This photo was taken in May 2013


Additional photos from another ancestor's grave site clearly show what D/2 Biological Solution can do for cleaning old marble tombstones.

This grave stone is for John Albert, a German immigrant from Baden.  He is one of my great-great-great grandfathers.  He is also buried in Our Lady Help of Christian's cemetery.  Note the black coloring on the stone.  This is a combination of lichens and the effects of acid rain on the stone.  Around 1980 I cleaned this stone with a wire brush.  I do not remember how "dirty" the stone was but I know now that scraping/rubbing the stone with a wire brush is an incorrect method for cleaning it. This stone was photographed in February 2013.


Note how bright and clear this stone is.I cleaned this stone in June 2013.  This photo was taken today, 29 September 2013.  The cleaning method was to scrub the stone with a soft nylon bristle brush and clean water. This lifted and removed a lot of the loose lichens on the stone.  Then I heavily sprayed the stone with D/2 and after 15 minutes I used the same brush and then re-scrubbed the stone. After another 10 minutes I scrubbed the stone with clean water and the cleaning process was complete. The stone was clean but over a period of a few weeks the stone brightened and became cleaner.  The chemical continues to work after your work is done. 


To clean this stone I spent about 10 minutes of active work to get the job done.  Most of the time spent was on waiting for D/2 to do its work.  This was a very easy process and very rewarding.